

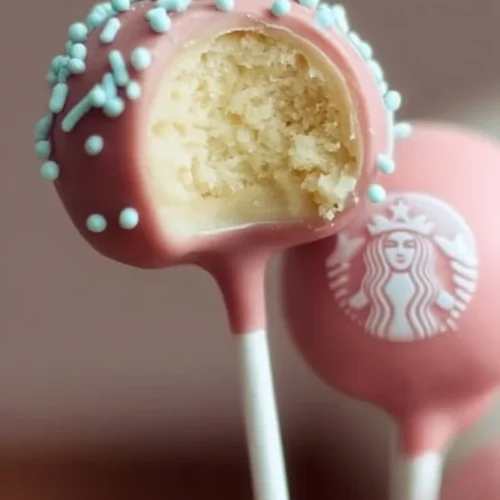
These bite-size cake pops taste just like the ones you pick up at the coffee shop but are much cheaper and faster to make at home. With a boxed vanilla cake mix, a cup of frosting, candy melts, and a little patience, you can produce glossy, snackable treats that are perfect for parties, school fundraisers, or an afternoon coffee break. If you enjoy pairing sweet treats with weekend breakfasts, try these cinnamon swirl pancakes for a sweet weekend breakfast for a cozy combo.
Why you’ll love this dish
These cake pops hit a sweet spot: they’re portable, customizable, and kid-approved. They’re also forgiving — minor variations in malling or texture can be fixed with small adjustments, so they’re great for beginner bakers.
“Perfect for birthday parties — bright, uniform, and everyone loved that chocolate shell.” — a quick review from a home baker
Reasons to try them:
- Fast: uses a boxed cake mix and jar frosting for huge time savings.
- Budget-friendly: one box and one tub make dozens of pops.
- Versatile: change cake mix, frosting flavor, or coating for endless variations.
- Crowd-pleasing presentation: glossy candy shell and sprinkles make them party-ready.
Step-by-step overview
This recipe is straightforward: bake, crumble, mix with frosting, shape, chill, insert sticks, dip, and decorate. Expect about 30 minutes of active work plus chilling time. The key moments are chilling the balls so the stick holds firmly, and tempering your coating so it stays smooth and crack-free.
What you’ll need
- 1 box vanilla cake mix (plus ingredients called for on the box: eggs, oil, water)
- 1 cup frosting (vanilla or complementary flavor)
- 1 bag melting candy or candy melts (white chocolate or colored melts)
- Cake pop sticks
- Sprinkles (optional)
Notes and substitutions: - Use homemade cake if preferred — just bake, cool, and crumble the same way.
- For chocolate coating, use good-quality candy melts or compound chocolate; white chocolate can be used but is more likely to seize if overheated.
- For dairy-free/vegan: choose a vegan cake mix, plant-based frosting, and vegan candy melts.
Step-by-step instructions
- Preheat and bake: Prepare the vanilla cake mix exactly as the package directs. Bake, then cool completely on a wire rack (cooling prevents greasy, gummy balls).
- Crumble: Break the cooled cake into small crumbs in a large bowl — no big chunks.
- Add frosting: Add 1 cup frosting to the crumbs. Mix with a spoon or clean hands until evenly combined. The mixture should hold together when pressed; add a tablespoon more frosting if dry, or a tablespoon of dry crumbs if too sticky.
- Shape: Form golf-ball-sized balls (or smaller bite-size) and place them on a parchment-lined baking sheet.
- Chill: Freeze the balls for about 30 minutes. This firms them so they don’t fall apart during dipping.
- Melt coating: Microwave the candy melts in a microwave-safe bowl at 50% power in 20–30 second bursts, stirring between bursts until smooth. Alternatively, melt in a double boiler. Avoid overheating.
- Secure sticks: Dip the tip of each stick about 1/2 inch into the melted candy, then insert it halfway into a cake ball. Return to the tray and chill briefly so the candy anchor sets.
- Dip: Hold the stick and dip the cake pop into the melted candy. Tap gently to remove excess and twirl to smooth the coating.
- Decorate: Add sprinkles while the coating is still wet.
- Set upright: Place pops upright in a floral foam block, a cake pop stand, or a shallow cup filled with rice until coating hardens.
Best ways to enjoy it
Serve them at room temperature so the center is soft and the shell has a satisfying snap. Cake pops pair beautifully with coffee, hot chocolate, or a brunch spread; try placing them next to a small stack of pancakes or muffins for variety. For a brunch pairing, serve cake pops alongside fluffy flapjacks — the best pancakes recipe to delight both kids and adults.
Presentation tips:
- Arrange on a tiered stand for parties.
- Wrap individually in cellophane and tie with ribbon for favors.
- Use themed sprinkles for holidays or color-coordinated events.
Storage and reheating tips
- Room temp: Store in an airtight container at room temperature for up to 2 days away from heat or direct sun.
- Refrigerator: Keep in a single layer in an airtight container for up to 5 days. Let come to room temperature before serving to avoid a hard center.
- Freezer: Freeze unwrapped pops on a tray until solid, then transfer to a freezer-safe container with parchment between layers. Freeze up to 2–3 months. Thaw in the refrigerator, then bring to room temp before serving.
Food safety note: Because these are fully cooked and use shelf-stable frosting, refrigeration is optional, but warmer kitchens and extended storage benefit from chilling.
Helpful cooking tips
- Consistency check: The cake-to-frosting ratio is important. The mixture should be dense enough to roll. If it crumbles, add frosting sparingly; if it’s greasy, add a few tablespoons of cake crumbs.
- Temperature control: Chill cake balls long enough that the stick adheres. If the coating is too thick, thin with a tiny bit of vegetable oil or candy melt-specific thinner (not water).
- Melting chocolate: Stir frequently and stop microwaving while some lumps remain; residual heat will finish melting. If chocolate seizes, add a small splash of neutral oil to smooth it.
- Stick stability: Don’t push the stick all the way through the ball — halfway gives the best balance. If a pop falls off, press it back into the melted coating and chill to reset.
- Quick drying: Place pops in the refrigerator for 5–10 minutes to speed up setting if you’re in a hurry.
Creative twists
- Flavor swaps: Use chocolate cake, red velvet, or lemon cake mixes. Match frosting accordingly (cream cheese for red velvet, lemon buttercream for lemon cake).
- Fillings: Make a hidden center by pressing a small dollop of jam or ganache into the ball before sealing with cake mixture.
- Dietary swaps: Gluten-free cake mixes and dairy-free frosting make these accessible to more diets. Use vegan candy melts for a fully plant-based pop.
- Fancy coatings: Drizzle contrasting melts, use crushed cookies, chopped nuts, toasted coconut, or edible glitter for upscale looks.
Common questions
Q: Can I use homemade cake instead of boxed mix?
A: Yes. Bake and cool the cake fully, then crumble and proceed the same way. Note: homemade cakes that are very moist may require a little extra dry crumbs or slightly less frosting.
Q: Why do cake pops fall apart or slide off the stick?
A: Usually because the balls weren’t chilled enough or the stick wasn’t anchored with melted candy first. Freeze or refrigerate longer, dip the stick tip into coating before inserting, and avoid overly soft mixtures.
Q: How long will cake pops last?
A: At room temp, about 1–2 days. Refrigerated in an airtight container, up to 5 days. Frozen pops keep 2–3 months; thaw in the refrigerator before serving.
Q: Can I make these ahead for a party?
A: Yes — make and freeze them, then thaw in the refrigerator the day before. Decorate just before serving if possible to keep sprinkles crisp.
Q: Is there a trick to getting a smooth coating without streaks?
A: Use melts that are fully smooth and at the right temperature — runny but not hot. Tap and twirl gently to remove excess, and use a spoon or offset spatula to straighten drips.
Cake Pops
Ingredients
Cake Base
- 1 box vanilla cake mix Plus ingredients called for on the box: eggs, oil, water.
Frosting
- 1 cup frosting (vanilla or complementary flavor) For binding the cake crumbles.
Coating
- 1 bag melting candy or candy melts White chocolate or colored melts.
Decoration
- as desired sprinkles Optional, for decoration.
- cake pop sticks For assembling the pops.
Instructions
Preparation
- Preheat the oven and bake the vanilla cake mix exactly as the package directs. Bake, then cool completely on a wire rack.
- Crumble the cooled cake into small crumbs in a large bowl.
- Add 1 cup frosting to the crumbs and mix until evenly combined. The mixture should hold together when pressed.
- Form golf-ball-sized balls and place them on a parchment-lined baking sheet.
- Freeze the balls for about 30 minutes to firm them up.
Coating & Decoration
- Microwave the candy melts in a microwave-safe bowl at 50% power until smooth, stirring frequently.
- Dip the tip of each stick into the melted candy, then insert it halfway into a cake ball.
- Dip the cake pop into the melted candy, tap gently to remove excess, and twirl to smooth the coating.
- Add sprinkles while the coating is still wet and set upright in a floral foam block or similar.