
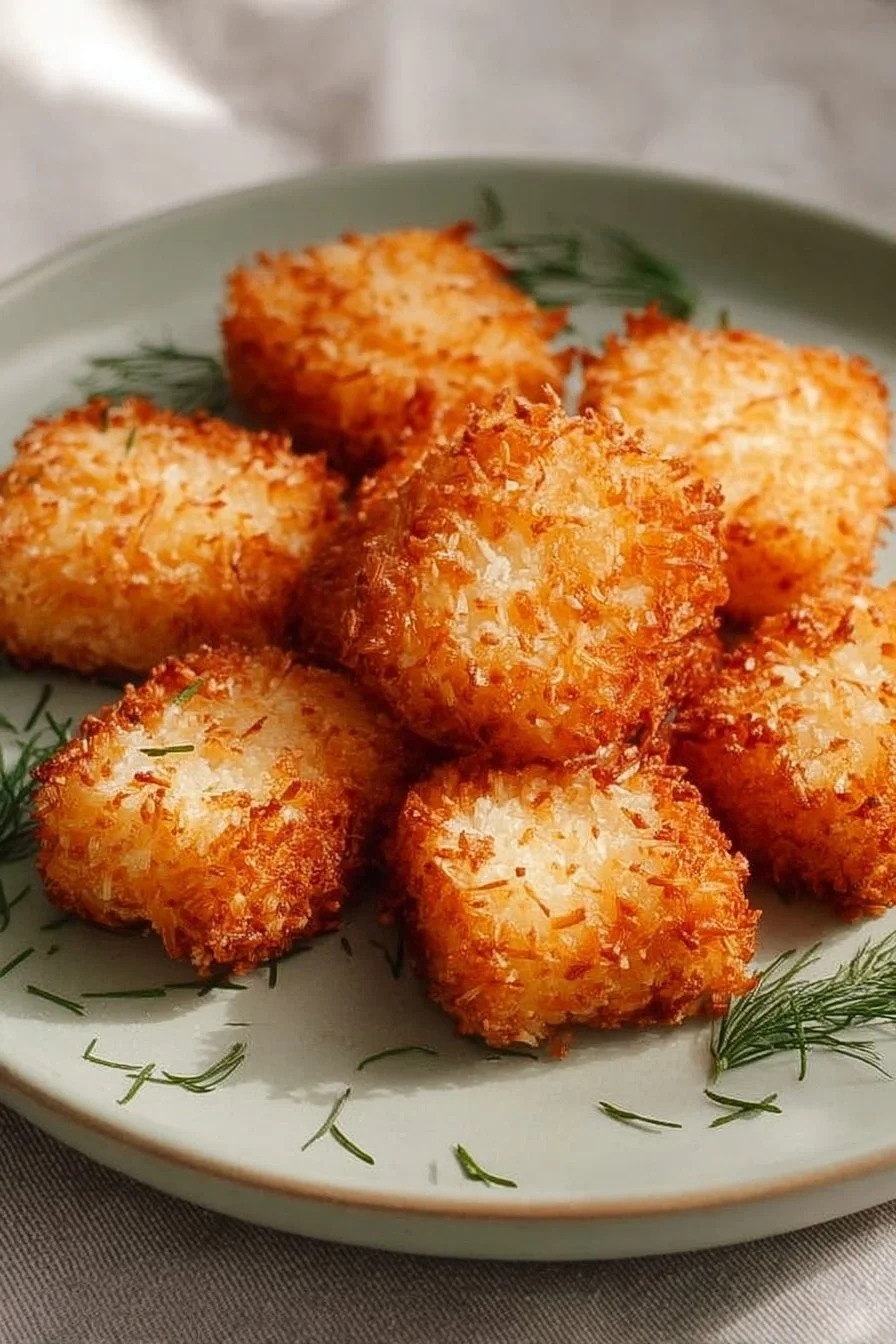
Crispy rice bites are little pan-fried rice cakes made from seasoned sushi rice, seared until golden and crunchy, then topped like mini sushi: avocado, tuna, spicy mayo, or anything you love. They’re a crunchy, handheld way to enjoy sushi flavors without rolling a single sheet of nori. If you enjoy bowls and small bites, this twist on Japanese-style crispy rice is a great crowd-pleaser and an addictive snack for parties or casual weeknights; for a riff that inspired modern versions, see this take on Bobby Flay’s crispy rice.
Why you’ll love this dish
These crispy rice bites give you every reason to swap a takeout order for a quick homemade batch. They’re:
- Textural: soft, seasoned sushi rice inside; a caramelized, crackly crust outside.
- Flexible: make them as simple or decked-out as you like — raw tuna, teriyaki mushrooms, or vegan sriracha-avocado all work.
- Fast: once the rice is cooked and cooled, shaping and pan‑frying takes minutes.
- Budget-friendly: pantry staples and modest protein toppings make it inexpensive to scale up.
“We served these at a casual dinner and everyone kept asking for more — crispy, fun, and the perfect vehicle for bold toppings.” — a repeat guest who prefers hand food over forks
These are ideal for weeknight dinners, appetizer platters, or kid-friendly make-your-own-topping nights.
How this recipe comes together
A quick overview so you know what to expect before cooking:
- Rinse and cook short-grain sushi rice until tender.
- Season the hot rice with a rice vinegar, sugar, and salt mixture to give it that classic sushi balance.
- Cool slightly, then form into small, compact cakes.
- Pan-fry the cakes in a modest amount of oil until both faces are golden and deeply crisp.
- Top and serve immediately so the contrast between crunch and creamy toppings stays vivid.
This flow means most of the work is passive (cooking and cooling rice), and active time is focused on quick frying and assembling.
What you’ll need
- 2 cups short-grain sushi rice — the high starch helps the cakes stick together. Do not substitute long-grain rice.
- 2 1/2 cups water — for a slightly sticky, tender rice.
- 1 tablespoon rice vinegar — provides the sushi flavor.
- 1 tablespoon sugar — balances the vinegar.
- 1 teaspoon salt — seasons the rice.
- Oil for frying — neutral oil with a high smoke point (canola, vegetable, or light olive oil).
- Your favorite sushi toppings — examples: sliced avocado, diced tuna or salmon, spicy mayo (mayo + sriracha), pickled ginger, scallions, sesame seeds, or a smear of unagi sauce.
Substitutions/notes:
- For lower sodium, reduce the salt and increase vinegar slightly.
- If you prefer gluten-free toppings, avoid soy sauce unless you use tamari.
Step-by-step instructions
- Rinse the sushi rice under cold water until the rinse water runs clear. This removes excess surface starch and prevents gluey rice.
- Combine the rinsed rice and 2 1/2 cups water in a medium pot. Bring to a boil, then reduce heat to low, cover, and simmer 18–20 minutes until the water is absorbed and rice is tender.
- Meanwhile, stir together rice vinegar, sugar, and salt in a small bowl until dissolved.
- When rice is done, remove from heat and immediately fold in the vinegar mixture. Use a wooden spoon or rice paddle and a gentle cutting motion to avoid crushing grains.
- Spread the hot, seasoned rice on a baking sheet or wide plate and let it cool slightly to room temperature — about 10–15 minutes. Slight cooling firms the rice so cakes hold together.
- Wet your hands and press small portions (about 2 tablespoons) of rice into compact patties or cakes. Aim for 1/2–3/4-inch thickness so they fry through without burning.
- Heat a frying pan over medium heat and add enough oil to coat the bottom (about 2–3 tablespoons). When shimmering, add rice cakes without crowding the pan.
- Fry until the undersides are golden brown and crisp, 3–5 minutes; flip and crisp the other side. Adjust heat as needed so they brown and not burn.
- Drain briefly on a paper towel, then top immediately with your chosen sushi-style toppings and sauces. Serve warm.
Best ways to enjoy it
These bites shine when they’re served right off the pan, while the crust is still popping. Some serving ideas:
- Classic: diced sashimi-grade tuna, a touch of soy or tamari, and a dot of spicy mayo.
- Veggie-forward: sliced avocado, sesame seeds, and a drizzle of ponzu.
- Comfort: crispy chilli beef inspired toppings for a meaty, sweet-heat contrast — a nice bridge to richer plates like crispy chilli beef rice.
- Party platter: arrange on a board with small bowls of sauces (unagi, spicy mayo, soy, pickled ginger) and let guests assemble.
Pair with a crisp green salad, miso soup, or chilled sake for a full meal.
Storage and reheating tips
- Refrigeration: Store leftover uncooked-shaped rice cakes or cooked cooled cakes in an airtight container in the fridge for up to 2 days. Keep toppings separate.
- Freezing: You can freeze uncooked rice cakes on a tray until solid, then bag them for up to 1 month. Fry from frozen, adding a minute or two per side.
- Reheating: Re-crisp in a skillet over medium heat with a little oil for 2–4 minutes per side. Avoid microwaving—the crust will go soggy.
- Food safety: Once topped with raw fish, consume immediately and do not refrigerate those finished bites for later. Sushi-grade fish should be handled and stored per local safety guidelines.
Helpful cooking tips
- Chill slightly for shaping: Rice is easiest to shape when warm but not piping hot; wet your hands to prevent sticking.
- Compact, don’t over-press: Press firmly enough to hold together but not so hard you compress all the air—some structure helps with a good crust.
- Don’t overcrowd the pan: Crowding lowers the oil temperature and prevents proper browning.
- Oil temperature test: Drop a small rice crumb in the oil—if it sizzles steadily, it’s ready.
- Even thickness: Keep cakes uniform in thickness so they cook evenly.
- Texture fix: If your rice is too dry, add a teaspoon of water when forming; if too watery, chill the rice a little longer.
Creative twists
- Baked version: Brush formed cakes with oil and bake at 425°F (220°C) for 12–15 minutes, flipping once, until crisp—less oil but a milder crust.
- Cheese-crisp layer: Sprinkle a little grated Parmesan in the pan beneath the rice for an umami crisp edge.
- Gluten-free crunch: Use gluten-free tamari in toppings and double-check sauces.
- Tempura topping: Top with tempura shrimp and spicy mayo for a decadent bite.
- Korean-style: Top with gochujang-glazed bulgogi for a spicy-sweet fusion.
Common questions
Q: Can I use a different type of rice?
A: Short-grain sushi rice is best because its higher starch content binds the cakes. Medium-grain can work in a pinch; long-grain rice will be too dry and won’t hold together.
Q: How do I keep the rice from falling apart when frying?
A: Ensure rice is slightly cooled and compacted firmly into cakes. A thin coating of cornstarch on the outside is optional to improve crisping and binding.
Q: Is it safe to top with raw fish?
A: Yes, if you use sushi- or sashimi-grade fish and follow safe handling practices. Keep fish chilled until assembly and serve immediately. Do not store rice bites topped with raw fish.
Q: Can I make the rice ahead of time?
A: You can cook and season the rice earlier in the day and refrigerate it, but bring it back to near room temperature before forming cakes for best texture. Cold, compacted rice fries well but may need slightly longer to crisp through.
Q: What oil is best for frying?
A: Use a neutral high-smoke-point oil like canola, vegetable, or light peanut oil. Avoid extra-virgin olive oil, which smokes at lower temperatures and can impart an off-flavor.
If you want more inspiration for crispy rice-style dishes and bold toppings, these linked recipes provide tasty variations and plating ideas.
Crispy Rice Bites
Ingredients
For the Rice Cakes
- 2 cups short-grain sushi rice The high starch helps the cakes stick together. Do not substitute long-grain rice.
- 2.5 cups water For slightly sticky, tender rice.
- 1 tablespoon rice vinegar Provides the sushi flavor.
- 1 tablespoon sugar Balances the vinegar.
- 1 teaspoon salt Seasons the rice.
- 2-3 tablespoons oil for frying Neutral oil with a high smoke point (canola, vegetable, or light olive oil).
For the Toppings
- various your favorite sushi toppings Examples: sliced avocado, diced tuna or salmon, spicy mayo (mayo + sriracha), pickled ginger, scallions, sesame seeds, or a smear of unagi sauce.
Instructions
Preparation
- Rinse the sushi rice under cold water until the rinse water runs clear to remove excess surface starch.
- Combine the rinsed rice and 2 1/2 cups water in a medium pot. Bring to a boil, then reduce heat to low, cover, and simmer for 18-20 minutes until the water is absorbed and rice is tender.
- Stir together rice vinegar, sugar, and salt in a small bowl until dissolved.
- When the rice is done, remove from heat and immediately fold in the vinegar mixture using a wooden spoon or rice paddle with a gentle cutting motion.
- Spread the hot, seasoned rice on a baking sheet or wide plate and let it cool slightly to room temperature (about 10-15 minutes).
Cooking
- Wet your hands and press small portions (about 2 tablespoons) of rice into compact patties or cakes, aiming for 1/2-3/4-inch thickness.
- Heat a frying pan over medium heat, adding enough oil to coat the bottom (about 2-3 tablespoons). When shimmering, add rice cakes without crowding the pan.
- Fry until the undersides are golden brown and crisp, about 3-5 minutes; flip and crisp the other side. Adjust heat as needed.
- Drain briefly on a paper towel, then top immediately with your chosen sushi-style toppings and sauces. Serve warm.