
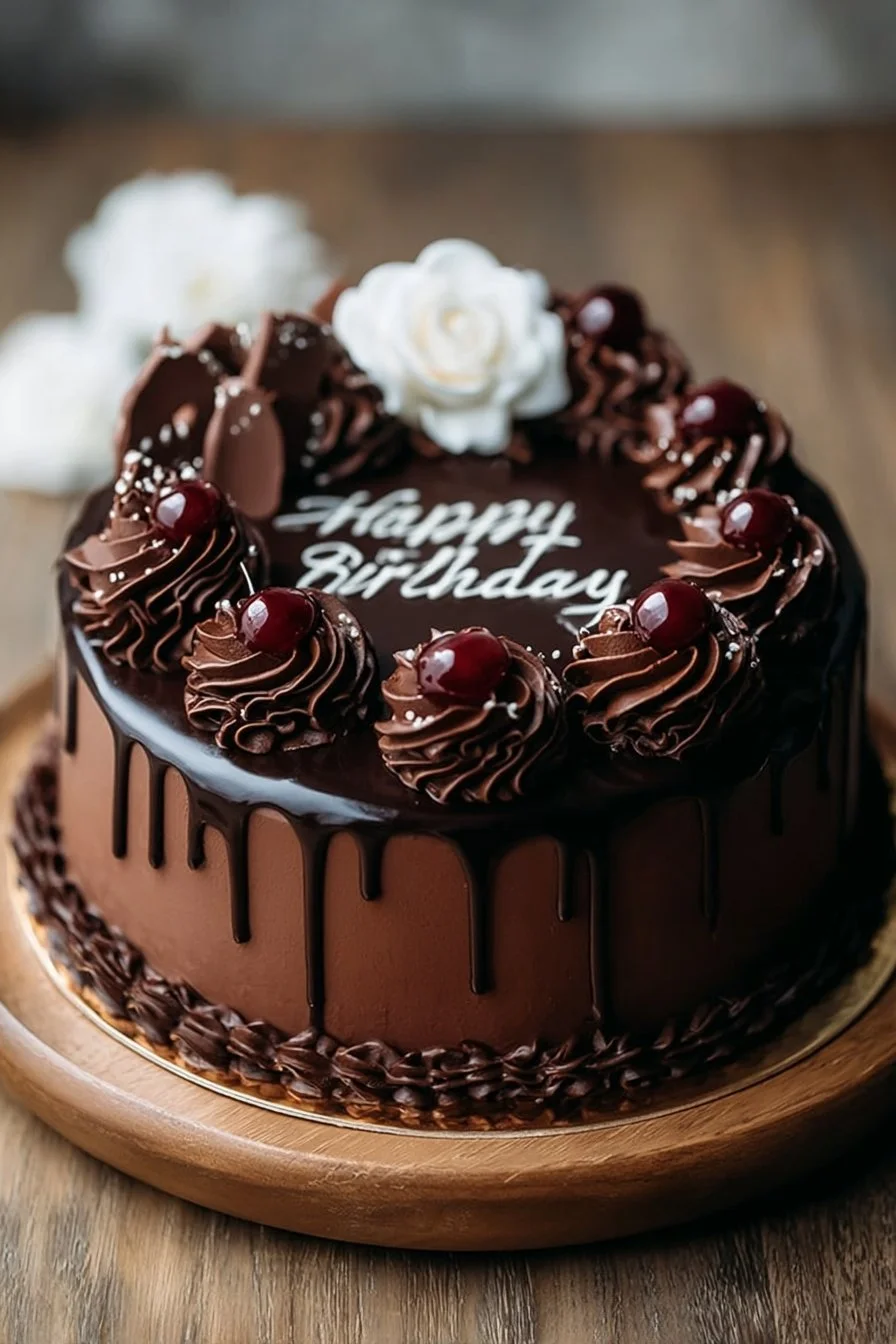
I still remember the first time I turned a simple chocolate sheet cake into a showstopper with nothing more than a warm ganache, a handful of sprinkles, and a steady hand — it transformed a plain birthday into something people kept talking about. This piece focuses on Simple and Creative Birthday Cake Decorating Ideas You Can Try at Home in 2025 — chocolate cake designs, chocolate cake decoration, and easy chocolate cake finishes you can execute with everyday tools and pantry ingredients.
Why you’ll love this dish
This isn’t about complicated sugar-paste sculpting; it’s about fast, high-impact chocolate cake decorating that looks professional without specialty equipment. Whether you’re finishing a boxed cake, sprucing up a from-scratch layer cake, or rescuing a last-minute celebration dessert, these decorating ideas give you polished results in under an hour.
- Kid-friendly: many decorations are safe for little helpers.
- Budget-wise: use pantry staples (chocolate, cream, sprinkles) and a few decorative items.
- Scalable: techniques work for cupcakes through multi-tier cakes.
- Modern looks: minimalist drips, textured spatula finishes, and chocolate shards that read as upscale.
“I tried the ganache drip and fresh-berry crown on a weeknight — everyone thought I’d ordered it. So easy and impressive.” — home baker, verified
If you like crunchy toppers, try adding toasted, thin chips for texture — for inspiration, check out these crunchy chocolate-covered potato chips that pair surprisingly well with soft frosting: chocolate-covered potato chips.
How this recipe comes together
Before you dive in, here’s the quick process so you know what to expect:
- Bake or buy a chocolate cake and cool completely. Level the layers if needed.
- Make a stable chocolate buttercream and apply a thin crumb coat; chill briefly.
- Prepare a pourable ganache for a glossy drip or coat.
- Smooth a final layer of buttercream and add a ganache drip, textured spatula pattern, or chocolate shards.
- Finish with toppings: fresh fruit, edible flowers, sprinkles, or candy. Chill to set, then serve.
This overview helps you plan — for instance, chilling times and ganache temperature are the two things that most often determine success.
What you’ll need
Ingredients and tools focused on chocolate cake decoration — amounts flexible depending on cake size (8–10-inch two-layer shown as a guide).
- Baked chocolate cake (one 8–10 inch two-layer cake, cooled and leveled) — store-bought or homemade.
- Chocolate buttercream:
- 1 cup (227g) unsalted butter, room temperature
- 3–4 cups (360–480g) powdered sugar, sifted
- 1/2 cup (45g) unsweetened cocoa powder
- 2–4 tbsp milk or cream
- 1 tsp vanilla extract
- Pinch of salt
- Ganache for drip:
- 8 oz (225g) semi-sweet chocolate, finely chopped
- 3/4 cup (180ml) heavy cream (adjust for thicker/thinner drip)
- Decorations (choose a few):
- Fresh berries, edible flowers, or mint
- Sprinkles, nonpareils, or sanding sugar
- Chocolate shards (see Directions)
- Candied nuts or praline pieces
- Edible gold leaf (optional)
- Chocolate candies or piped rosettes
- Tools:
- Offset spatula, bench scraper or cake scraper
- Turntable (highly recommended)
- Piping bags and tips (round and star tips)
- Small saucepan and heatproof bowl for ganache
- Bowl of ice water (for rapid cooling)
- Sharp knife or bench scraper for chocolate shards
Notes and substitutions:
- For dairy-free/vegan: use coconut cream for ganache and plant-based butter + aquafaba or vegan buttercream recipe.
- Cocoa powder can be Dutch-processed or natural; taste may vary slightly.
Step-by-step instructions
- Prep the cake: Level the tops with a serrated knife so layers sit flat. Place the bottom layer on a cake board or plate.
- Apply filling: Add a thin layer of buttercream between layers (about 1/2 cup), then place the next layer. Press gently to level.
- Crumb coat: Spread a thin layer of buttercream all over the cake to trap crumbs. Smooth with an offset spatula and chill 15–30 minutes until slightly firm.
- Final coat: Apply a thicker, even layer of buttercream. Use a scraper against the turntable to smooth sides; create a textured look by dragging the back of the spatula vertically or horizontally if you prefer a rustic finish.
- Make ganache: Heat cream until it just simmers; pour over chopped chocolate and let sit 1–2 minutes, then stir until glossy and smooth. Cool until slightly thickened but still pourable (about 5–10 minutes depending on room temp).
- Drip application: Transfer ganache to a squeeze bottle or spoon. Gently apply around the cake edge to create drips; finish by filling the center with more ganache and smoothing lightly.
- Chocolate shards (optional): Melt 6–8 oz chocolate, spread thinly on parchment-lined tray, chill until set but still flexible, then score with a knife and break into shards. Tuck shards into the top edge or cluster on one side.
- Final decorations: Pipe rosettes, arrange berries, scatter sprinkles, or place candied nuts. If using fresh flowers, ensure petals are pesticide-free and use a barrier (floral tape or a small square of plastic) between stem and cake.
- Chill briefly (10–20 min) to set decorations, then bring to room temperature about 30 minutes before serving for best texture.
Short timing note: expect 30–60 minutes active decorating time once your cake is cooled and crumb-coated.
Best ways to enjoy it
Serve slices with a small scoop of vanilla or salted caramel ice cream and a cup of strong coffee or espresso to cut through the richness. For extra crunch and contrast, offer a bowl of candied pecans or praline on the side — they pair beautifully with chocolate, especially if you like a caramel-nut accent: chocolate and caramel covered pecans.
Plating ideas:
- Minimal single-slice plate: thin ganache drip, one piped rosette, and two halved raspberries.
- Celebration platter: assorted small slices with varied toppings (sprinkles, gold leaf, shard).
- Kid-friendly: top with a small toy or number candle and use bright multicolor sprinkles.
Presentation tip: a thin swipe of contrasting color (white chocolate or caramel) across the top edge immediately modernizes the look.
Storage and reheating tips
- Short-term: Store decorated chocolate cake in an airtight cake keeper or a large dome at room temperature (away from heat) for up to 24 hours. Buttercream and ganache are stable at room temp for a day.
- Refrigeration: For longer storage (2–4 days), refrigerate in an airtight container. Bring to room temperature for 30–60 minutes before serving to soften buttercream and restore flavor.
- Freezing: You can freeze individual slices wrapped tightly in plastic and foil for up to 2 months. Thaw overnight in the fridge and then bring to room temp before serving.
- Safety note: If using fresh cream-based fillings or fresh fruit, refrigerate promptly and consume within 48 hours.
Avoid leaving the cake in warm environments (above 75°F / 24°C) — ganache drips will soften and decorations may slide.
Pro chef tips
- Temperature control: The single most important factor is ganache temperature. Too hot = melts buttercream; too cool = no drip. Aim for warm and glossy, about 85–95°F (29–35°C).
- Stabilize buttercream: If you need the cake to stand in warm weather, add 1–2 tablespoons of vegetable shortening to make the buttercream firmer.
- Leveling is everything: A level cake makes smoothing faster and more even. Use a cake leveler or serrated knife and a rotating motion.
- Work cold between steps: Chill briefly after the crumb coat and before adding heavy toppings to prevent sliding.
- Clean edges: Keep a warm, clean offset spatula on hand. Wipe it between swipes for perfect smoothness.
- Practice piping on parchment: If trying a new piping tip or rosette style, test first on parchment to avoid surprises.
Creative twists
- Drip + floral: Classic ganache drip with edible flowers and gold flecks for weddings or milestone birthdays.
- Naked chocolate cake: Thin smear of buttercream with visible layers, finished with berries and a dusting of cocoa powder for rustic charm.
- Chocolate shard crown: Use tempered dark chocolate shards threaded vertically around the top and dusted with powdered sugar for drama.
- Candy overload: For younger crowds, cover the top with favorite candies and a circle of piped buttercream.
- Vegan/gluten-free swap: Use a gluten-free cake base and coconut-based ganache; stabilize with a plant-based buttercream formula.
- Flavor pairings: Add espresso to ganache for mocha, orange zest to buttercream for chocolate-orange, or a salted caramel drizzle for contrast.
Common questions
Q: How long does it take to decorate a cake like this?
A: If the cake is already baked and cooled, expect 30–60 minutes to crumb coat, chill, apply the final coat, do a ganache drip, and add decorations. Allow extra time if you’re making from scratch.
Q: Can I use store-bought frosting and still get a good finish?
A: Yes. Store-bought frosting works well for quick decorating. Smooth it with a warm spatula and apply the same crumb coat/chill routine. For a shinier drip, use homemade ganache.
Q: Can I decorate a cake the day before?
A: Yes — for most buttercream-and-ganache cakes, decorating a day ahead is fine. Store refrigerated in an airtight container and bring to room temperature before serving. Avoid decorating far ahead if using delicate fresh flowers.
Q: How do I keep decorations from sliding on a tall cake?
A: Chill between major steps, use a firmer buttercream, and support heavy toppers (like large fruit) with small wooden picks or dowels.
Q: Are fresh flowers safe on cake?
A: Use pesticide-free, edible varieties when possible. Create a barrier (plastic wrap or floral picks) between cut stems and the cake to prevent sap contact.
If you want specific templates for quick piped borders or step-by-step photos, tell me the size and level of detail you want — I can lay out a timed decorating plan for a 6-, 8-, or 10-inch cake.
Chocolate Cake Decoration
Ingredients
Chocolate Cake
- 1 cake Baked chocolate cake (one 8–10 inch two-layer, cooled and leveled) Store-bought or homemade.
Chocolate Buttercream
- 1 cup Unsalted butter, room temperature 227g
- 3–4 cups Powdered sugar, sifted 360–480g
- 1/2 cup Unsweetened cocoa powder 45g
- 2–4 tbsp Milk or cream
- 1 tsp Vanilla extract
- 1 pinch Salt
Ganache for Drip
- 8 oz Semi-sweet chocolate, finely chopped 225g
- 3/4 cup Heavy cream 180ml (adjust for thicker/thinner drip)
Decorations
- Fresh berries, edible flowers, or mint Choose a few decorations.
- Sprinkles, nonpareils, or sanding sugar
- Chocolate shards See Directions.
- Candied nuts or praline pieces
- Edible gold leaf Optional.
- Chocolate candies or piped rosettes
Instructions
Preparation
- Level the top of the cake layers with a serrated knife so they sit flat.
- Place the bottom layer on a cake board or plate.
- Add a thin layer of buttercream between layers (about 1/2 cup), then press the next layer gently to level.
- Spread a thin layer of buttercream all over the cake to trap crumbs and chill for 15–30 minutes until firm.
- Apply a thicker, even layer of buttercream, smoothing the sides with a scraper.
Ganache Application
- Heat cream until it simmers, pour over chopped chocolate, and let sit for 1–2 minutes before stirring until smooth.
- Cool until slightly thickened (about 5–10 minutes) before transferring to a squeeze bottle or spoon.
- Gently apply ganache around the cake edges to create drips and fill the center for a smooth finish.
Final Decorating
- Add chocolate shards or desired decorations like piped rosettes or fresh berries.
- Chill briefly to set the decorations, then bring to room temperature for best texture before serving.