
These little cake-on-a-stick bites capture the fun of a Starbucks birthday cake pop without the café price. Soft vanilla cake, a simple buttercream binder, and a candy-coated shell make them perfect for kids’ parties, bake sales, or an easy celebration treat at home. They’re also a great weekend project when you want something festive but not fussy — and if you like portable sweets like the cinnamon swirl pancakes for a sweet weekend breakfast, these will fit right into your rotation.
Why you’ll love these cake pops
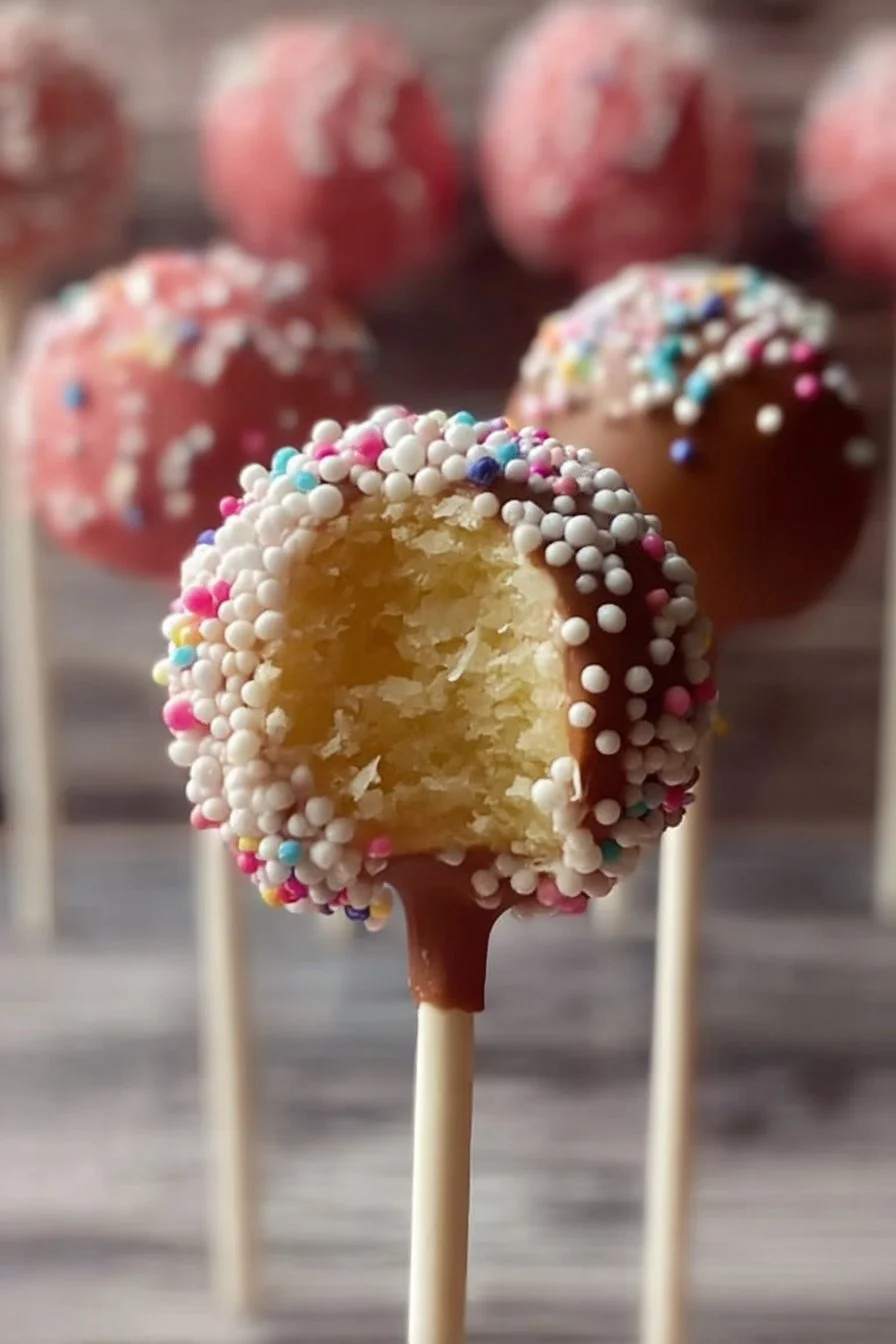
These copycat birthday cake pops are fast, forgiving, and crowd-pleasing. Using a boxed cake mix keeps the work minimal while the homemade buttercream gives you control over sweetness and texture. The candy shell makes them travel-friendly and keeps crumbs contained—ideal for birthday parties, classroom treats, or gift boxes.
“My kids called them ‘party lollipops’ and devoured a dozen in one afternoon—easy to make and impressively close to the real thing.”
Quick wins:
- Minimal skill needed: no piping or advanced decorating.
- Budget-friendly: boxed mix + pantry staples.
- Portable and portion-controlled: perfect for parties.
- Kid-friendly colors and sprinkles make them festive.
The cooking process explained
You’ll bake a simple vanilla cake, crumble it while warm, mix in a soft buttercream, and roll the mixture into uniform balls. Chill the balls so they set, insert dipped lollipop sticks, then coat each pop in melted candy melts and decorate. The full process is straightforward but timing (don’t overbake, chill as instructed) is what makes consistent, sturdy pops.
What you’ll need
- 1 (13.25 oz) box vanilla cake mix (any brand)
- 1/3 cup neutral oil (vegetable, canola, avocado) — can swap for melted coconut oil for a subtle flavor
- 1 cup milk or water (milk = richer crumb)
- 4 large eggs
- 1/4 cup unsalted butter, softened (for buttercream)
- 1 cup powdered sugar (for buttercream)
- 1 tsp vanilla extract
- Pinch of salt
- 1 tsp milk (for buttercream; add more if needed for consistency)
- 12 oz candy melts (pink or white; use colors as desired)
- White nonpareils or sprinkles for decoration
Notes on substitutions:
- Gluten-free: use a gluten-free boxed cake mix and confirm candy melts are GF.
- Vegan: try a vegan boxed cake mix and a vegan butter substitute plus aquafaba or egg replacer—results vary.
- Candy melt alternatives: tempered chocolate works, but it firmens differently and dark chocolate will change the look and taste.
Step-by-step instructions
- Preheat the oven to the temperature recommended on your cake mix box (typically 325–350°F / 162–175°C). Choose temp based on pan size—shallower pans may bake faster.
- Combine the cake mix, oil, milk or water, and eggs in a large bowl. Mix until combined but don’t overwork.
- Pour batter into a greased or lined pan and bake. Start checking 2–4 minutes before the package time by inserting a toothpick into the center; if it comes out clean, it’s done. Avoid overbaking—moist cake binds better.
- Immediately transfer baked cake to a large mixing bowl while still hot. Use a paddle attachment on low speed to crumble until no large chunks remain. Alternatively, crumble slightly cooled cake by hand or with a hand mixer.
- In a small bowl, beat the softened butter, powdered sugar, vanilla, pinch of salt, and 1 tsp milk until fairly smooth. Small lumps in powdered sugar are normal. Adjust milk to reach a spreadable but firm buttercream.
- Add the buttercream to the crumbled cake. Mix until fully incorporated and the mixture holds together when squeezed.
- Weigh or portion out about 30 g per pop (roughly 1¼-inch / 3 cm balls). Roll into smooth balls and place on a baking sheet.
- Freeze the balls for 15 minutes, then let them come to room temperature for 10 minutes while you melt a small amount of candy melts. Heat in 15–30 second increments in the microwave, stirring until thin and smooth.
- Dip the tip of each lollipop stick into the melted candy and insert halfway into each cake ball. Return the tray to the freezer for 15 minutes to set the stick.
- Melt the remaining candy melts to a slightly thin consistency. Submerge each cake pop into the coating fully to the stick to seal and adhere. Hold the stick and gently tap to remove excess. Avoid a second dunk—extra weight can dislodge the pop.
- Quickly decorate with sprinkles or nonpareils while the coating is wet. Place finished pops upright in a styrofoam block or a cake pop stand to dry.
How to serve them
Serve cake pops at room temperature for the best texture. They’re great on dessert tables, packaged in clear bags as party favors, or arranged in a colorful stand for a birthday centerpiece. For a savory-sweet party spread, pair them with sliders or finger sandwiches—or balance sweet and savory with crowd-pleasers like a Chick-fil-A crispy chicken sandwich copycat for grown-up guests.
Presentation ideas:
- Arrange in a bouquet-style holder with tissue paper.
- Place 3–5 on individual dessert plates with a small scoop of ice cream.
- Package 4–6 in cellophane with ribbon for favors.
Storage and reheating tips
- At room temperature: store in an airtight container for up to 2 days. The candy shell protects the crumb, but buttercream inside benefits from cooler storage if your kitchen is warm.
- Refrigeration: keep in a single layer in an airtight container for up to 5 days. Bring to room temperature 20–30 minutes before serving so the coating isn’t too firm and flavors bloom.
- Freezing: freeze in a single layer on a baking sheet until solid, then transfer to an airtight container or freezer bag for up to 1 month. Thaw overnight in the refrigerator, then bring to room temperature before serving.
- Food safety: the cake contains cooked eggs and butter; refrigeration is safest if keeping more than two days or in hot climates.
Helpful cooking tips
- Don’t overbake the cake. A slightly underbaked, moist crumb holds together better and produces smoother pops.
- Use consistent sizing. A small scoop or a kitchen scale (30 g) gives uniform pops that set and coat evenly.
- Chill between steps. Freezing/refreshing times prevent cracking and help the stick stay attached.
- Thin candy melts gradually. If the coating is too thick it will clump; add small amounts of vegetable shortening or coconut oil to thin if needed (1 tsp at a time).
- Avoid double-dipping. Two dippings add weight and can detach the ball from the stick. If you need a thicker shell, thin the melt and dunk once, letting extra drip off thoroughly.
- Quick decorating: have sprinkles at the ready and work in small batches so the coating doesn’t set before finishing.
Creative twists to try
- Flavor swaps: add a teaspoon of almond extract to the buttercream, or fold in 1–2 tablespoons of jam for a fruity center.
- Color and theme: use colored candy melts and matching sprinkles for holidays or team colors.
- Mini versions: make smaller 20 g pops for bite-size servings.
- Chocolate lovers: swap cake mix for chocolate or use a chocolate ganache coating.
- Dietary versions: use gluten-free cake mix and certified GF candy melts. For vegan attempts, use vegan cake mix and vegan butter plus vegan candy melts; texture may differ.
Common questions
Q: How long does it take to make these from start to finish?
A: Active hands-on time is about 45–60 minutes, plus chill and bake time. Baking the cake (including prep) takes 25–40 minutes depending on pan size; chilling and dipping add another 30–45 minutes total.
Q: Why did some cake pops fall off the stick?
A: The most common causes are the stick not being dipped in coating before insertion, inserting too deeply or shallowly, or coating that’s too thick/heavy. Dip stick tip, insert halfway, freeze to set, and use a thin, fluid coating for dipping.
Q: Can I use homemade cake instead of boxed mix?
A: Yes. Any sturdy vanilla cake works. Ensure it’s not too moist or oily; crumb should be slightly dry so it binds with buttercream. If your homemade cake is very moist, add a bit more powdered sugar to the binder.
Q: Are these safe to make ahead for a party?
A: Yes. Store in the refrigerator up to 5 days or freeze for longer. Bring to room temperature before serving for best texture.
Q: Can I use melted chocolate instead of candy melts?
A: Yes—tempered or slightly thinned chocolate works well but hardens differently and can show fingerprints. Dark chocolate will give a different flavor profile than the classic birthday cake pop.
If you want recipe variations, troubleshooting help, or a printable version of the directions, let me know and I’ll tailor it to your needs.

Birthday Cake Pops
Ingredients
For the Cake
- 1 box vanilla cake mix (13.25 oz) Any brand
- 1/3 cup neutral oil Vegetable, canola, or avocado oil; can substitute with melted coconut oil
- 1 cup milk or water Using milk results in a richer crumb
- 4 large eggs
For the Buttercream
- 1/4 cup unsalted butter, softened
- 1 cup powdered sugar
- 1 tsp vanilla extract
- 1 pinch salt
- 1 tsp milk Add more if needed for consistency
For Coating and Decoration
- 12 oz candy melts Pink or white; use colors as desired
- to taste white nonpareils or sprinkles For decoration
Instructions
Baking the Cake
- Preheat the oven to the temperature recommended on your cake mix box (typically 325–350°F / 162–175°C).
- Combine the cake mix, oil, milk or water, and eggs in a large bowl. Mix until combined but don’t overwork.
- Pour batter into a greased or lined pan and bake. Start checking 2–4 minutes before the package time by inserting a toothpick; if it comes out clean, it’s done.
- Transfer baked cake to a mixing bowl while still hot and crumble until no large chunks remain.
Making the Buttercream
- In a small bowl, beat the softened butter, powdered sugar, vanilla, pinch of salt, and 1 tsp milk until smooth.
- Adjust milk to reach a spreadable but firm buttercream.
Preparing and Molding the Pops
- Mix the buttercream with the crumbled cake until it holds together.
- Weigh or portion out about 30g per pop (roughly 1¼-inch / 3 cm balls) and roll into smooth balls.
- Freeze the balls for 15 minutes, then let them come to room temperature while melting a small amount of candy melts.
- Dip the tip of each lollipop stick into the melted candy and insert into each cake ball. Freeze for 15 minutes to set.
Coating and Decorating
- Melt the remaining candy melts to a slightly thin consistency. Submerge each cake pop into the coating fully to the stick.
- Gently tap to remove excess and quickly decorate with sprinkles while the coating is wet.
- Place finished pops upright to dry.