
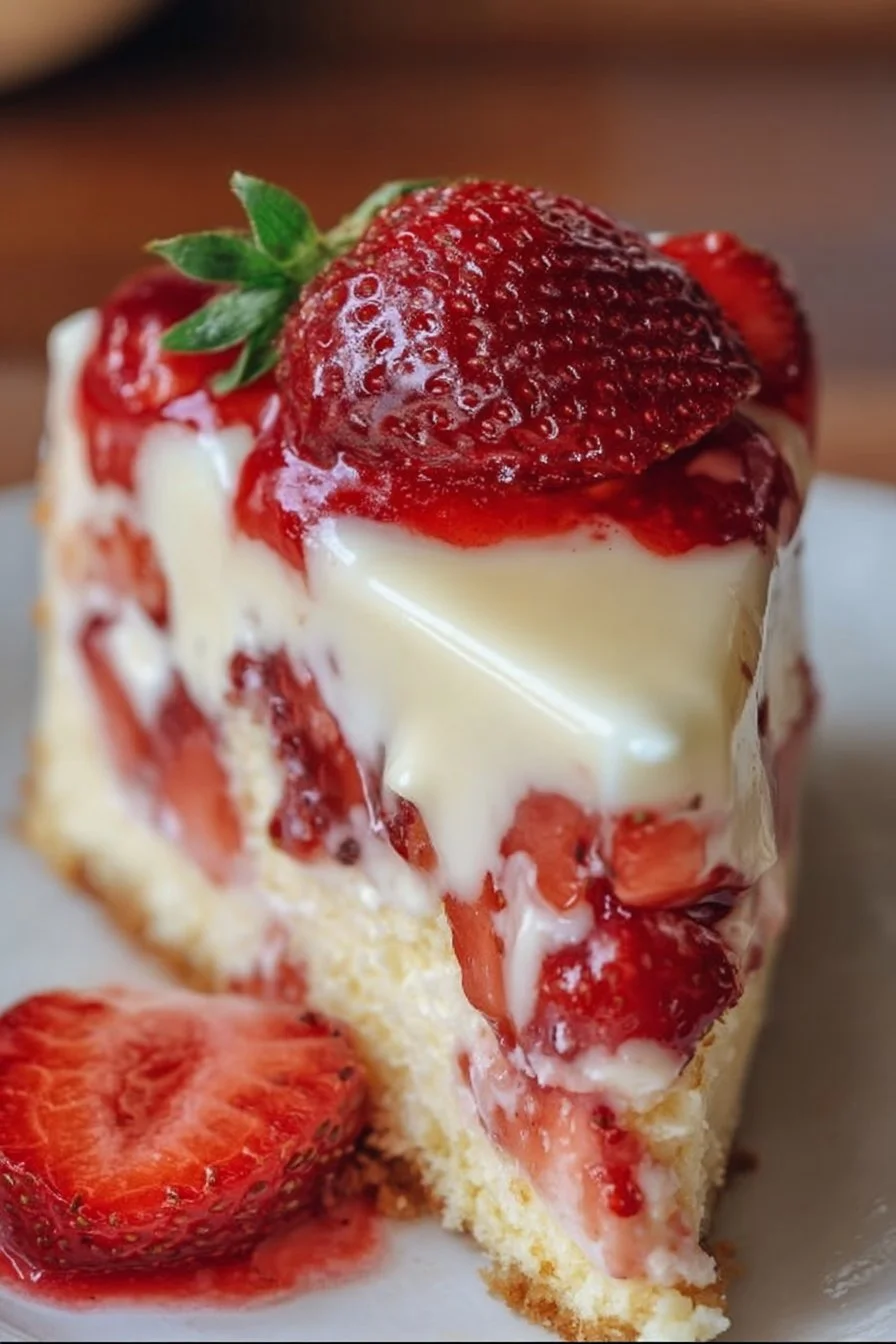
Strawberry Custard Delight Cake is a light, layered sponge filled with homemade vanilla custard and fresh strawberries, finished with whipped cream and halved berries on top. It’s the kind of dessert that works for birthday brunches, spring parties, or anytime you want a show-stopping yet approachable cake. The tender cake layers, silky custard, and juicy strawberries create a classic balance of texture and flavor — and yes, it’s easier than it looks.
Why you’ll love this dish
This cake combines a soft, buttery sponge with a homemade custard that tastes richer than store-bought fillings. It’s an excellent make-ahead dessert for celebrations because you can prepare components in advance and assemble the cake the day of the event. Kids adore the layers and bright strawberries, while adults appreciate the custard’s vanilla depth.
“Light, fresh, and impossibly creamy — everyone asked for seconds.” — a quick family test taste
If you enjoy fruit-forward desserts, try pairing this with other easy fruit treats on your dessert table — for example, a fried fruit bite like our Banana Tempura Recipe for a contrasting texture.
Step-by-step overview
You’ll bake two 9-inch round cakes, make a stovetop vanilla custard, slice the cakes into four thin layers, and then assemble by alternating cake, custard, and diced strawberries. After a final custard layer, the cake is topped with halved strawberries and piped whipped cream, then chilled so the custard sets and flavors meld. The custard needs cooling time, so plan about 3–4 hours from start to chilled serving (active hands-on time is much less).
What you’ll need
- 2 ½ cups all-purpose flour
- 2 ½ tsp baking powder
- ½ tsp salt
- 1 cup unsalted butter, softened (room temperature)
- 1 ½ cups granulated sugar (for cake)
- 4 large eggs
- 1 tsp vanilla extract
- 1 cup milk (for cake batter)
For the custard filling:
- 2 cups whole milk
- ½ cup granulated sugar
- 3 tbsp cornstarch
- 4 large egg yolks
- 2 tbsp unsalted butter
- 1 tsp vanilla extract
For assembly and finishing:
- 2 cups fresh strawberries, diced (plus whole/halved for topping)
- Whipped cream for decorating
Notes and substitutions:
- Use 2% milk in a pinch for the cake, but whole milk gives the custard richer texture.
- For a lighter custard, you can replace ½ cup of whole milk with heavy cream.
- To make this gluten-free, substitute a 1:1 gluten-free flour blend that includes xanthan gum and check bake times; texture will vary.
Step-by-step instructions
- Preheat and prepare pans: Preheat oven to 350°F (175°C). Grease and flour two 9-inch round cake pans; line bottoms with parchment if you prefer easier release.
- Mix dry ingredients: In a bowl, whisk together 2 ½ cups all-purpose flour, 2 ½ tsp baking powder, and ½ tsp salt. Set aside.
- Cream butter and sugar: In a separate large bowl, beat 1 cup softened unsalted butter with 1 ½ cups sugar until light and fluffy, about 3–4 minutes with a hand or stand mixer.
- Add eggs and vanilla: Beat in 4 large eggs one at a time, scraping the bowl after each. Stir in 1 tsp vanilla extract.
- Combine dry and wet: Alternate adding dry mixture and 1 cup milk to the butter-egg mix, beginning and ending with the dry mix. Mix until just combined — avoid overmixing to keep cake tender.
- Bake: Divide batter evenly between prepared pans. Bake 25–30 minutes, or until a toothpick inserted in the center comes out clean. Let cakes cool in pans 10 minutes, then turn out onto a rack and cool completely.
- Make the custard: In a saucepan, heat 2 cups whole milk until warm (do not boil). In a bowl, whisk ½ cup sugar, 3 tbsp cornstarch, and 4 egg yolks until smooth. Slowly pour the warm milk into the yolk mixture in a thin stream while whisking constantly (this tempers the yolks). Return the mixture to the saucepan and cook over medium heat, stirring constantly, until it thickens and just begins to bubble. Remove from heat, stir in 2 tbsp butter and 1 tsp vanilla. Immediately press plastic wrap directly onto the surface of the custard to prevent a skin from forming. Let cool to room temperature, then chill until firm.
- Slice cake layers: When fully cooled, slice each cake horizontally to create four thin layers total. A long serrated knife or a cake leveler gives the cleanest results.
- Assemble: Place one cake layer on your serving plate. Spread a layer of custard (about a third of total) and sprinkle with diced strawberries. Repeat for the remaining layers. Finish by spreading the remaining custard on top and garnish with halved strawberries. Pipe whipped cream around the edges if desired.
- Chill and serve: Refrigerate the assembled cake for at least 1–2 hours (longer if possible) so the custard firms and the flavors meld. Slice with a sharp knife and wipe between cuts for neat slices.
How to plate and pair
For a polished presentation, place the cake on a cake stand and pipe medium-sized rosettes of whipped cream around the edge. Scatter a few diced strawberries in the center or drizzle a light strawberry coulis on the plate for color. Pair servings with:
- A cup of black tea or a lightly sweetened iced tea (cuts the richness)
- Sparkling wine for celebrations (bubbles complement the custard)
- A side of lemon sorbet to add a bright, acidic contrast
Storage and reheating tips
- Refrigeration: Store the assembled cake in the refrigerator, covered, for up to 3 days. Because the cake contains fresh fruit and custard, refrigeration is required.
- Unassembled components: Cake layers wrapped tightly can be refrigerated 2–3 days or frozen up to 2 months. Custard keeps 3–4 days refrigerated in an airtight container.
- Freezing: I do not recommend freezing the fully assembled cake — custard and strawberries lose texture when frozen and thawed. Instead, freeze individual cake layers and thaw in the refrigerator before assembly.
- Reheating: This is best served chilled. If the custard has stiffened in the fridge, bring slices to room temperature for 10–15 minutes before serving for the best texture.
Helpful cooking tips
- Temper eggs carefully: When adding warm milk to the egg yolks, pour slowly while whisking to avoid scrambling.
- Thin custard fix: If a custard gets too thick, whisk in a tablespoon or two of warm milk off the heat until you reach the desired consistency.
- Prevent soggy cake: Lightly brush each layer with a thin syrup (equal parts sugar and water, heated and cooled) if your strawberries are particularly juicy. This keeps the cake from becoming soggy while adding controlled moisture.
- Clean slices: Use a hot, clean knife and wipe it between cuts for neat slices. Dip the knife in hot water and dry it before each slice.
- Make-ahead strategy: Bake cake layers and make custard the day before. Keep custard chilled and assemble on the event day for best texture and appearance.
Creative twists
- Citrus-vanilla custard: Add 1 tsp lemon zest to the custard for a refreshing citrus note.
- Mixed-berry version: Replace half the strawberries with raspberries or blueberries for varied color and tartness.
- Butterscotch-strawberry hybrid: For a caramel undertone, swirl a light butterscotch sauce into the top layer of custard; for inspiration on butterscotch flavors, check this Butterscotch Randy Recipe.
- Dairy-free option: Use coconut milk for the custard and a vegan butter substitute for the cake to make it dairy-free; note texture will be slightly different.
- Mini cake version: Make this as a layered 6-inch cake or as individual trifle glasses for party portions.
Common questions
Q: How long does this cake take from start to finish?
A: Active time is about 1–1.5 hours (baking and custard-making). Cooling and chilling add another 2–3 hours, so plan for about 3–4 hours total from start to chilled serving.
Q: Is the custard safe to eat since it uses egg yolks?
A: Yes — the custard is cooked on the stovetop and should be heated until it thickens and small bubbles form, which takes it past the safe 160°F (71°C) threshold to kill pathogens. Tempering the yolks prevents curdling and ensures a smooth texture.
Q: Can I make this ahead and freeze it?
A: Freeze individual cake layers (well wrapped) up to 2 months. Custard does not freeze well — it can separate and become grainy. For best results, assemble the cake after thawing the layers and using refrigerated custard.
Q: How can I keep the cake from getting soggy from the strawberries?
A: Pat strawberries dry before dicing. If they’re very juicy, sprinkle them with a teaspoon of sugar and drain, or brush the layers with a light simple syrup to control moisture. Chilling between assembly steps helps too.
Q: Can I substitute whipped cream filling for the custard?
A: You can, but the texture and richness will change. Whipped cream fillings are lighter and won’t set as firmly, so the cake will be softer and best served shortly after assembly.
If you want any variations turned into a full recipe (gluten-free, citrus custard, or mini trifles), tell me which one and I’ll write a step-by-step version.
Strawberry Custard Delight Cake
Ingredients
For the cake
- 2.5 cups all-purpose flour
- 2.5 tsp baking powder
- 0.5 tsp salt
- 1 cup unsalted butter, softened (room temperature)
- 1.5 cups granulated sugar (for cake)
- 4 large eggs
- 1 tsp vanilla extract
- 1 cup milk (for cake batter)
For the custard filling
- 2 cups whole milk
- 0.5 cup granulated sugar
- 3 tbsp cornstarch
- 4 large egg yolks
- 2 tbsp unsalted butter
- 1 tsp vanilla extract
For assembly and finishing
- 2 cups fresh strawberries, diced Plus whole/halved for topping
- to taste Whipped cream for decorating
Instructions
Preparation
- Preheat oven to 350°F (175°C). Grease and flour two 9-inch round cake pans; line bottoms with parchment if preferred.
- In a bowl, whisk together flour, baking powder, and salt. Set aside.
- In a separate large bowl, beat butter with sugar until light and fluffy, about 3-4 minutes.
- Beat in eggs one at a time and stir in vanilla extract.
- Alternate adding dry mixture and milk to the butter-egg mix, beginning and ending with the dry mix. Mix until just combined.
Baking
- Divide batter evenly between prepared pans. Bake for 25-30 minutes or until a toothpick comes out clean. Cool in pans for 10 minutes, then turn out onto a rack to cool completely.
Make the custard
- In a saucepan, heat whole milk until warm (do not boil).
- Whisk together sugar, cornstarch, and egg yolks until smooth. Slowly pour in the warm milk while whisking continuously.
- Return the mixture to the saucepan and cook over medium heat, stirring until it thickens and starts to bubble. Stir in butter and vanilla, then cool and chill.
Assembly
- When cooled, slice each cake horizontally to create four thin layers.
- Place one layer on a serving plate. Spread a layer of custard and sprinkle with diced strawberries. Repeat with remaining layers.
- Top with remaining custard and garnish with halved strawberries and piped whipped cream around the edges.
Chill and serve
- Refrigerate for at least 1-2 hours so the custard firms. Slice with a clean knife for neat portions.