
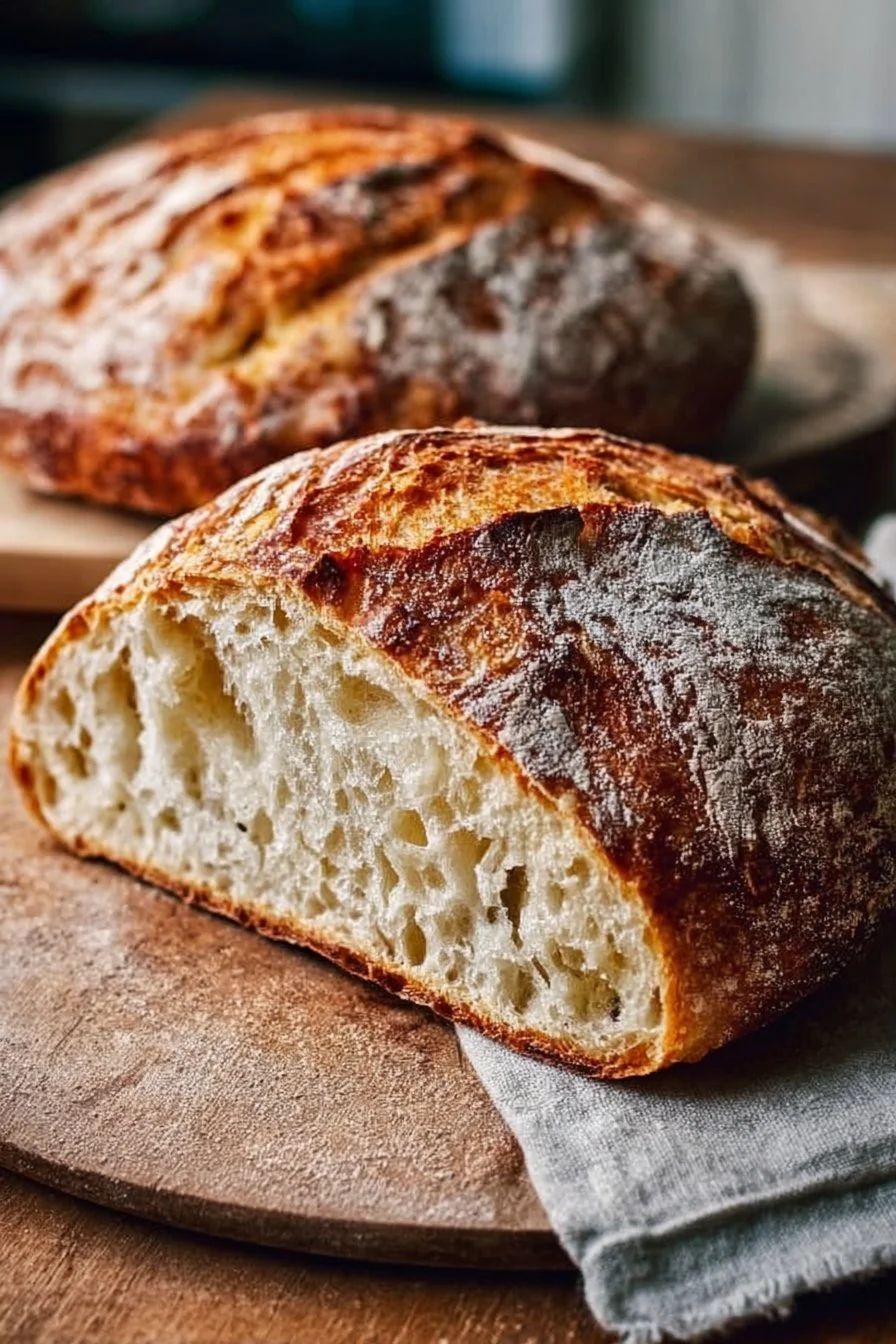
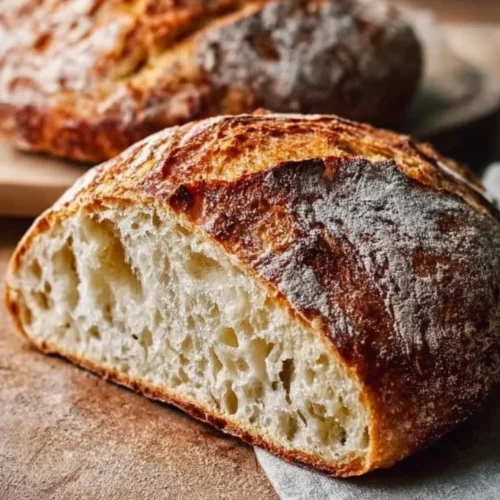
Nothing tastes as comforting as a crackling sourdough loaf straight from a hot Dutch oven — that crisp, caramelized crust and the tangy, open crumb are worth the patience. This straightforward sourdough recipe uses just flour, water, salt and active starter, and is great for a weekend bake when you can plan the long ferment. If you want a quick way to use sourdough discard while you wait for your next bake, try the quick sourdough discard garlic knots for a tasty snack that won’t go to waste.
Why you’ll love this dish
This recipe strikes the sweet spot between simplicity and artisan results. With just four basic ingredients and a few well-timed stretch-and-folds, you’ll get a loaf with a crisp crust, a slightly tangy flavor, and an open, chewy crumb. It’s the kind of bread that elevates a sandwich, stands up to hearty soups, and makes breakfast feel special.
“My family fought over the heel — simple ingredients, huge payoff.” — a satisfied home baker
Reasons to try it:
- Minimal hands-on time: most of the process is passive fermenting.
- Flexible schedule: cold retardation in the fridge makes timing easier.
- Beginner-friendly technique: stretch-and-folds replace complex kneading.
- Great texture and flavor without commercial yeast.
How this recipe comes together
This loaf follows a classic sourdough workflow so you know what to expect: mix flour and water to autolyse, add starter and salt, build structure with periodic stretch-and-folds, bulk ferment until doubled, shape, retard overnight in the fridge, then bake in a preheated Dutch oven for maximum oven spring and crust.
High-level timeline:
- Mix + 30-minute rest (autolyse)
- Add starter + salt; 2 hours of periodic stretch-and-folds
- Bulk ferment 6–8 hours at room temp
- Shape, cold proof 8–12 hours in fridge
- Bake 45 minutes total in a 450°F (232°C) Dutch oven
What you’ll need
- 4 cups (500 g) bread flour or all-purpose flour — bread flour gives more chew; AP is fine for a softer crumb.
- 1 2/3 cups (375 g) warm water — aim for ~75–80°F (24–27°C).
- 1 cup (200 g) active sourdough starter — fed and bubbly within 4–8 hours of feeding.
- 2 teaspoons (10 g) fine salt.
Optional tools and notes:
- Dutch oven (6–8 qt) or a baking stone + steam method if you don’t have one.
- Banneton or a bowl lined with a well-floured towel for proofing.
- Lame or sharp knife for scoring.
Substitutions: swap up to 20% of the flour for whole wheat or rye for extra flavor, but expect a denser crumb and slightly faster fermentation.
Step-by-step instructions
- In a large mixing bowl, combine 4 cups (500 g) flour and 1 2/3 cups (375 g) warm water. Stir until a shaggy dough forms.
- Cover and let rest for 30 minutes (autolyse). This hydrates the flour and helps gluten development.
- Add 1 cup (200 g) active sourdough starter and 2 teaspoons (10 g) salt. Mix until fully incorporated. The dough will be sticky.
- Cover the bowl and let it sit at room temperature. For the next 2 hours, perform a set of stretch-and-folds every 30 minutes (four sets total): reach under one side of the dough, pull it up, fold it over the top, turn the bowl 90°, and repeat until you’ve folded all four sides.
- After the final fold, cover and let the dough bulk ferment for 6 to 8 hours at room temperature. It should roughly double and look bubbly and puffy. If your kitchen is cool, expect the longer end of that range.
- Gently transfer the dough to a lightly floured surface. Shape into a round or oval by folding the edges underneath, creating surface tension.
- Place the shaped dough seam-side up in a well-floured proofing basket or a bowl lined with a floured towel. Cover and refrigerate for 8 to 12 hours (cold retardation improves flavor).
- Preheat your oven to 450°F (232°C) with a Dutch oven inside for at least 30 minutes.
- Remove the dough from the fridge, invert it onto parchment paper, and score the top with a sharp blade to control expansion.
- Carefully lower the dough (on the parchment) into the hot Dutch oven. Cover and bake for 20 minutes. Remove the lid and bake uncovered for 25 more minutes, until deeply browned.
- Remove the bread from the Dutch oven and cool completely on a wire rack (at least 1 hour) before slicing to set the crumb.
Best ways to enjoy it
- Slice thick for toast and top with mashed avocado, a sprinkle of salt, and chile flakes.
- Serve with soups and stews—the crust holds up to dipping.
- Make an elevated grilled cheese: sharp cheddar, a smear of mustard, and a crisp pan-fry.
- For a breakfast board, pair with cultured butter, honey, and seasonal fruit.
If you want a contrasting texture on the same table, try serving small fried breads like Indian fry bread alongside for guests who like something crisp and indulgent.
Storage and reheating tips
- Room temperature: store the loaf in a paper bag or bread box for 2–3 days; this keeps the crust crisper than plastic.
- Freezing: slice the cooled loaf and freeze in a sealed bag for up to 3 months. Toast or reheat slices directly from frozen.
- Reheating whole loaf: reheat in a 375°F (190°C) oven for 8–12 minutes wrapped in foil, or unwrap for the last 3 minutes to refresh the crust.
Food safety: once sliced, consume within a few days to enjoy best texture; mold can develop if stored in humid conditions, so discard if you see any signs of spoilage.
Pro chef tips
- Active starter: it should float in a water test or be visibly bubbly and doubled after feeding. Underactive starter = weak rise.
- Hydration tweaks: this recipe is moderately wet; if you prefer easier handling, reduce water by 10–20 g. For more open crumb, increase hydration gradually.
- Temperature control: warmer kitchens speed fermentation. Aim for an ambient 70–75°F (21–24°C) for predictable timing.
- Scoring: cut quickly and confidently — a shallow 1/4–1/2 inch slash lets the loaf expand without tearing unpredictably.
- Steam trap: if you don’t have a Dutch oven, use a baking tray with hot water or place a metal tray on the oven floor and pour hot water in at the start of baking to mimic steam.
Creative twists
- Herb and garlic: fold in 1–2 tablespoons minced garlic and 2 tablespoons chopped rosemary during the shaping stage.
- Seeded crust: brush the top with water and press sesame, poppy, or sunflower seeds into the surface before baking.
- Olive and thyme: add 3/4 cup chopped olives and a tablespoon of thyme for a savory Mediterranean loaf.
- Whole grain version: replace 100 g of the white flour with whole wheat and increase hydration by 20–30 g to compensate.
- For a fried alternative using sourdough techniques, explore flat fried breads that borrow the tang of fermented dough.
Common questions
Q: How long does this bread take start-to-finish?
A: Hands-on time is about 30–45 minutes spread across stages. Total elapsed time is roughly 18–24 hours including cold retardation (bulk ferment 8+ hours, fridge 8–12 hours) — much of that is passive.
Q: Can I use active dry yeast instead of sourdough starter?
A: Yes. Use about 1 to 1 1/2 teaspoons instant yeast and reduce bulk ferment time to 1–2 hours depending on temperature. Flavor will be less tangy and more neutral.
Q: How do I know when the bread is fully baked?
A: The crust should be deep golden-brown. Internal temperature should read 200–210°F (93–99°C) with an instant-read thermometer. A hollow sound when you tap the bottom is another classic indicator.
Q: Can I skip the fridge proof?
A: You can do a same-day bake after bulk fermentation and a short bench rest, but cold retardation improves flavor and oven spring. If you skip it, expect milder taste and faster timing.
Q: Why didn’t my loaf rise much in the oven?
A: Common causes: underactive starter, over-proofing (dough exhausted), or insufficient oven heat. Ensure starter is bubbly, do a gentle poke test (dough should spring back slowly), and preheat the Dutch oven thoroughly.
If you want more sourdough-inspired recipes and ways to use your starter, check out the garlic knot idea above — it’s an easy way to make something delicious while your loaf ferments.
Classic Sourdough Bread
Ingredients
Main Ingredients
- 4 cups 4 cups (500 g) bread flour or all-purpose flour Bread flour gives more chew; all-purpose flour is fine for a softer crumb.
- 1 2/3 cups 1 2/3 cups (375 g) warm water Aim for ~75–80°F (24–27°C).
- 1 cup 1 cup (200 g) active sourdough starter Should be fed and bubbly within 4–8 hours of feeding.
- 2 teaspoons 2 teaspoons (10 g) fine salt
Instructions
Preparation
- In a large mixing bowl, combine 4 cups (500 g) flour and 1 2/3 cups (375 g) warm water. Stir until a shaggy dough forms.
- Cover and let rest for 30 minutes (autolyse).
- Add 1 cup (200 g) active sourdough starter and 2 teaspoons (10 g) salt. Mix until fully incorporated. The dough will be sticky.
- Cover the bowl and let it sit at room temperature.
Bulk Fermentation
- For the next 2 hours, perform a set of stretch-and-folds every 30 minutes (four sets total).
- After the final fold, cover and let the dough bulk ferment for 6 to 8 hours at room temperature until it roughly doubles and looks bubbly and puffy.
Shaping and Cold Proofing
- Transfer the dough to a lightly floured surface and shape it into a round or oval.
- Place the shaped dough seam-side up in a well-floured proofing basket. Cover and refrigerate for 8 to 12 hours.
Baking
- Preheat your oven to 450°F (232°C) with a Dutch oven inside for at least 30 minutes.
- Remove the dough from the fridge, invert it onto parchment paper, and score the top.
- Carefully lower the dough into the hot Dutch oven. Cover and bake for 20 minutes.
- Remove the lid and bake uncovered for 25 more minutes, until deeply browned.
- Remove the bread from the Dutch oven and cool completely on a wire rack.